Setting up Maven with SmartClient
SmartClient directly supports the use of Maven for managing your projects. In this example, we’ll show you exactly how easy it is to set up SmartClient with Maven to locate and load out DataSources that you may require for your project.
As a headline, SmartClient artifacts are not published to any public repository, but a POM for each is included in the SDK and can be used to install them to your private Maven repository.
The official Isomorphic plugin for Maven contains a handful of targets intended to simplify that process through automation. Please refer to the plugin’s documentation for usage and examples.
The first step is to install Maven (if you haven’t already done so).
Next, install SmartClient using the following Maven command (open a command line to do this):
C:\>mvn com.isomorphic:isc-maven-plugin:1.4.3:install
-Dproduct=SMARTCLIENT -Dlicense=EVAL -DbuildNumber=13.0d
This will download the latest version of SmartClient Evaluation to your local computer Note: if you use Power, Enterprise, or Pro, then that is the value you should enter for -Dlicense. The same applies to -DbuildNumber (for example, 12.0p or 12.1p if that is what you use).
Then, copy and paste the code below and follow any prompts to create the project. Note: Maven sometimes asks for values that you have already stated; if this occurs, simply type it in again when the prompt for that value appears.
mvn archetype:generate
    -DartifactId=my-application
    -Dmodule=MyApplication -Dmodule-short-name=myapp
    -DgroupId=com.example -Dpackage=com.example.myapplication
    -DarchetypeGroupId=com.isomorphic.archetype
    -DarchetypeArtifactId=archetype-smartclient-quickstart
    -DarchetypeVersion=LATEST -DinteractiveMode=false
Now we will set up our new Maven project to load out some standard SQL DataSources that are in the SmartClient SDK
Navigate to the new directory
cd my-applicationTo add DataSourcess, edit src/main/webapp/datasources.jsp and replace the default <sc:loadDS> tag content with the supplyItem and supplyCategory DataSource names as shown below:

Return to the command line and launch the Jetty server.
mvn jetty:run
Wait for the console to indicate that the server is running and navigate to the application at http://localhost:8080/my-application/index.jsp
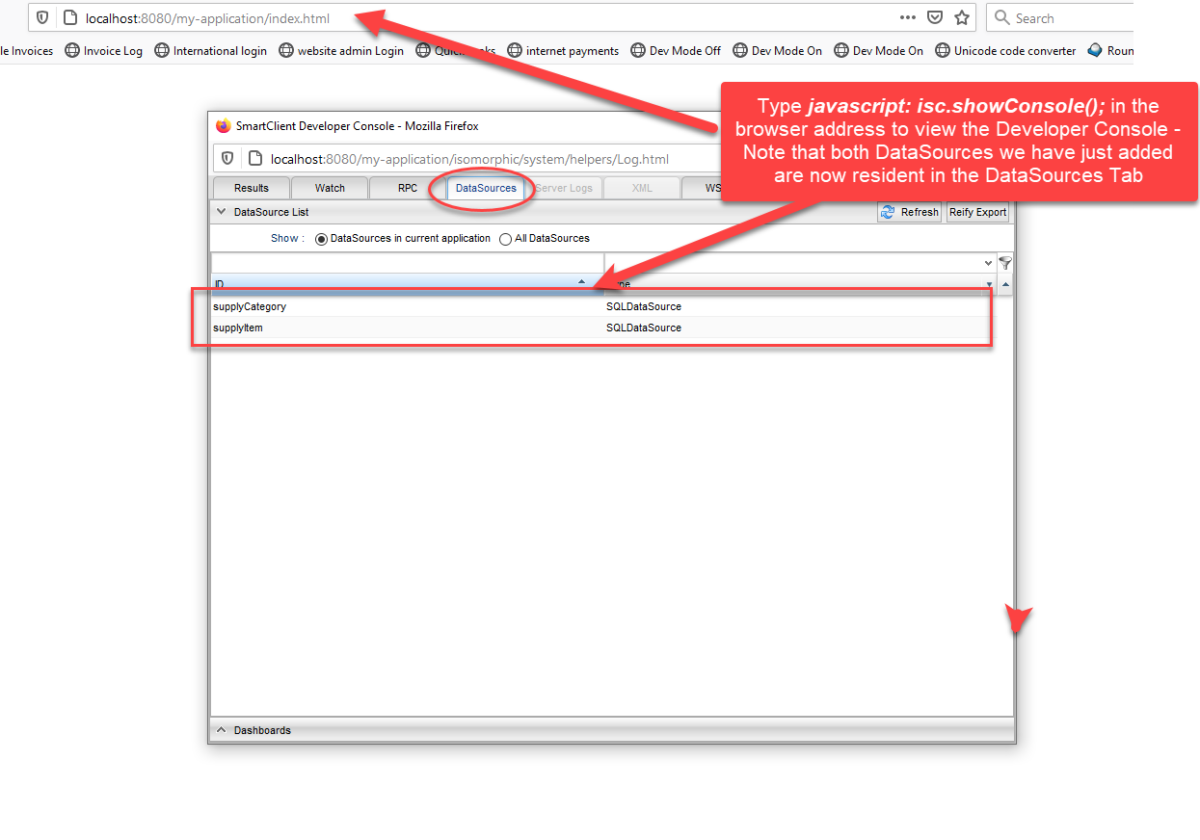
In your browser, open a JavaScript console and enter the following javascript: isc.showConsole(); and click on the DataSources tab to show that the 2 DataSources we require have now been correctly loaded for this project.
Because we removed the old loadDS definition, the screen doesn’t display anything as we have removed the binding element of the main application program. To see what could have displayed, stop Jetty (Ctrl + C), navigate to src/main/webapp/js/myapp.jsp and change the grid definition to bind to supplyItem rather than Product, and remove some additional grouping code, as shown below:
Now restart Jetty and navigate to your application again and you will see that a grid now renders out showing the supplyItem data we had previously defined
Obviously, where you store your main bootstrap application program and the structure of your projects is in your hands, but you can see from this example, just how simple it is to generate your first SmartClient starter project using Maven. It really is that easy!!!
You can find out more about our Maven plugin here and if you want to know more about the artifacts that get installed when you install the plugin take a look here.
Enjoy!!! If you want to know more about SmartClient, why not register today and take a free 60 day trial, or contact us to find out more
Thanks
The Isomorphic Team